I was looking for a project to do while I was learning to TIG weld and I needed a cart for my welder and plasma cutter so I thought this would be a perfect fit.
The design of the welding cart could have been simplified but since one of my objectives was to learn TIG welding in the process I didn't mind doing a bit more work and in the process creating longer weld seams. Besides, it looks more professional to have all the pieces fit flush with each other.
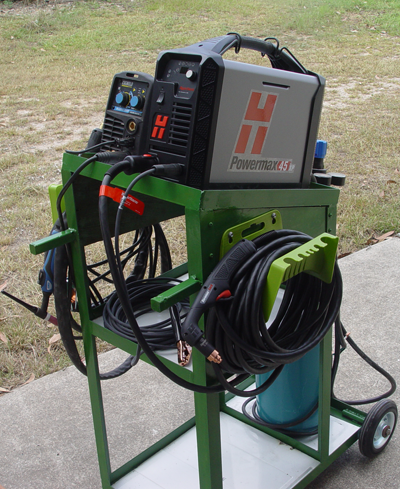
I designed the slope on the top in order to tilt the welder and plasma cutter up so I could read the dials without bending. The plasma cutter isn't a problem because the good folks at Hypertherm were thoughtful enough to add a digital readout. The CIGWeld TIG machine on the other hand has a dial with just a few numbers etched around it and is something of a test of my eyesight to guess where 85 might be between 60 and 100, hence the desire to get the best viewing angle.
The slope of the top can be reversed simply by swapping the long and short uprights, in fact the one I built is reversed from the plans. I chose to do this because I thought it would be a better fit for where I planned to park it in the workshop. Now that it is complete I am not so sure if that was a wise decision. I will try it for a while and if it doesn't work out as planned I can always cut the top off and reverse it.
This is the result, I hope you enjoy it and you can download the plans at the bottom of the page.
The videos were intended to fully document the build process. I am sorry to say that they do not measure up to the standard that I envisioned when I started. This was my first attempt at a video of this nature and I can say that they do improve as I got more experience with the things that were going wrong. Unfortunately I didn't know what needed fixing until I have made the days video and reviewed it, too late to do another take because that part of the build was done and dusted. Episode 5 is better than episode 1 and I expect the next project will be even better still.
P.S. In case you are wondering why it took 5 days to complete such a simple project we were in the middle of a heat wave with temperatures reaching as high as 44°C (111°F) so I only worked for a few hours each day in the cooler part of the morning (basically before the sun came up :-) ).
|